Development

Plugin Manager

Plugin Manager

The Plugin Manager controls what buttons are displayed in the editor’s interface. It allows plugins to be published, unpublished and assigned to specific toolbars with the ability to setup user permissions. In addition to these features the Plugin Manager will allow you to drill down and edit each and every plugin that makes up the Ark Editor. The plugin allows for 3 global parameters for the dialog popup screens: Height, Title and Width and you will find further customisable parameters just like any standard Joomla extension!

To locate these settings please go to 'Components' > 'Ark Editor' which will take you to the Control Panel, as seen below:

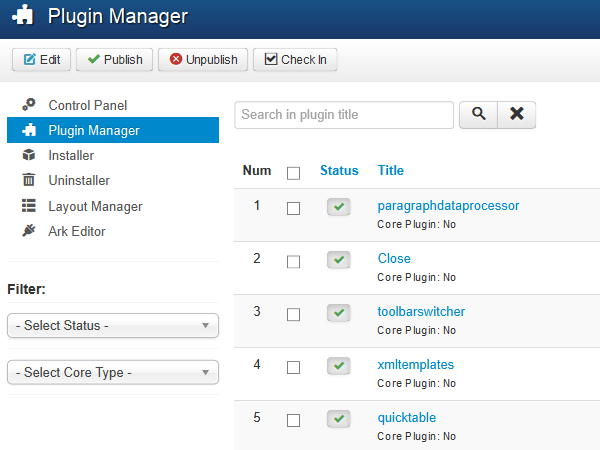
Next click on the 'Plugin Manager' icon to view the 55 plus core plugins that make up the Ark Editor by default. This works exactly the same as the default Joomla Extension or Article Manager allowing the user to filter and edit plugins. To edit a plugin's setting either tick the 'check box' and click on 'Edit' (or click on the 'Title' of the plugin), as seen below:

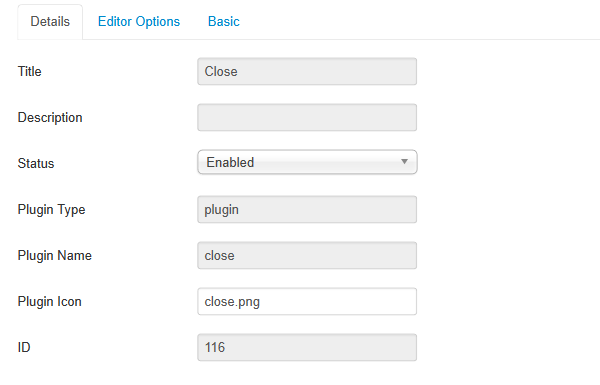
You will notice that all plugins have 3 tabs labelled 'Details', 'Editor Option', and 'Basic'.

The 'Details' tab displays the basic details of the plugin such as the name and publish state and the icon path used in the toolbar, please see below:

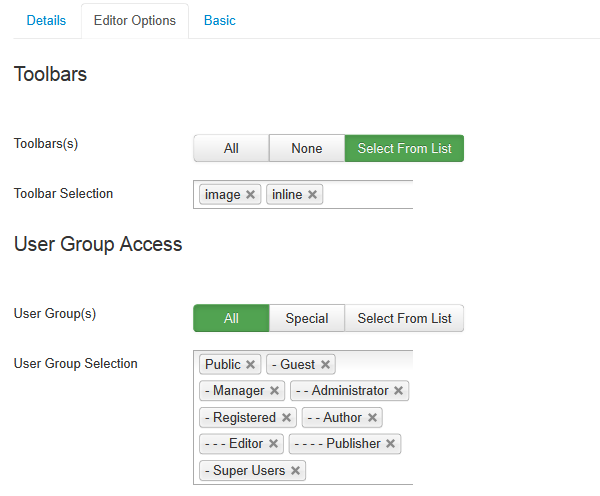
The 'Editor Options' tab gives the user the ability to assign the plugin to 'toolbars' and 'user groups'.

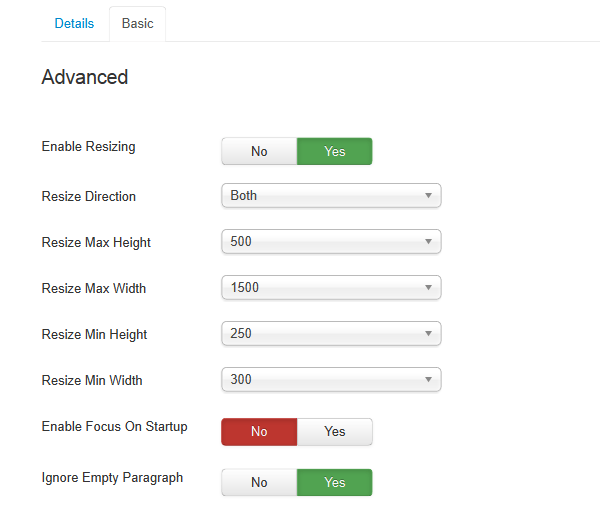
Some plugins have some more advanced options which are found under the  'Basic' tab.  This can differ from plugin to plugin depending upon its purpose.

But you don’t have to stop here as the editor's architecture is totally plugin based, so you can find a wealth of other customisable settings from plugin to plugin.

Read more: Plugin Manager

  • Hits: 48

Layout Manager - Toolbar Reference Guide

Layout Manager - Toolbar Reference Guide

Working with a Document

Toolbar Button
Description
View or edit the source code of the document (for advanced users).
Save the contents and submit its data to the server, when the Editor is placed inside an HTML form (for inline editing mode only).
Show a preview of the document in the shape that will be displayed to end users.
Select a layout template.
Cut the selected text fragment to the clipboard.
Copy the selected text fragment to the clipboard.
Paste content copied to the clipboard along with formatting.
Paste content copied to the clipboard without formatting.
Paste content copied from Microsoft Word or similar applications along with formatting.
Print document contents.
Check spelling of the document text or turn on the Spell Check As You Type (SCAYT) feature.
Undo or redo the most recent action performed.
Select all contents of the document.
Remove the formatting of the selected text.
Maximize the editor in the browser window.
Highlight all block-level elements in the document.
Show information about JCK Editor.

Text Styling

Toolbar Button
Description
Apply bold, italic, underline or strike-through formatting to the text.
Apply superscript or subscript formatting to the text.
Apply pre-defined combinations of various formatting options to block and inline elements.
Apply pre-defined block-level combinations of various formatting options.
Change the typeface of the text.
Change the font size of the text.
Change the color of the text.
Change the background color of the text.

Text Layout

Toolbar Button
Description
Increase or decrease text indentation.
Format a block of text as indented quotation.
Create a new div element in document source.
Set text alignment (left, centered, right or justified).
Insert a divider line (horizontal rule) into the document.

Rich Text

Toolbar Button
Description
Create a numbered or bulleted list.
Create or remove a hyperlink in the text. These features may also be used to manage file uploads and links to files on the web server.
Link to documents.
Insert a link anchor to the text.
Insert an image into the document. This will cause the media manager to load up.
Insert an Adobe Flash object into the document.
Create a table with the defined number of columns and rows.
Insert an emoticon image (smiley or icon).
Insert a special character or symbol.

Ark Editor Plugins

Toolbar Button
Description
Media embed is a plugin that allows users to embed YouTube, Vimeo and other media code into the editor.

Read more: Layout Manager - Toolbar Reference Guide

  • Hits: 67

Layout Manager - Toolbar Assignment

Layout Manager - Toolbar Assignment

In some deployments you may want to use a different toolbar, with a different set of icons for a specific part of your website. For instance you may want to use the 'blog' toolbar for your blogging component while having a more advanced 'editorial' toolbar for the rest of your site. 

You can do this by selecting the 'Component Assignment' tab (or editing in the toolbar you are editing. And right click on the 'component' item you want your toolbar to work with (or 'Ctrl'  'click' for multiple options). Save and - job done!

Read more: Layout Manager - Toolbar Assignment

  • Hits: 29

Layout Manager

Layout Manager

Introduction

The ARK Editor Layout Manager seeks to improve upon both the JCK Editor and JCE. User permissions are now set on a plugin level which is more flexible and in keeping with Joomla’s logic. For an example with JCE you would be required to create a plethora of toolbars to set your user permissions but with the ARK Editor you can achieve this with “one toolbar” by setting up user permissions on the plugin level. This means that one toolbar can be setup to support multiple user groups. To learn about this please see: Plugin permissions.

Layout Manager

The Layout manager allows control over the editors Toolbars, with it you can create your own bespoke toolbars, position plugins, create new toolbars, add and remove! It’s easy to do thanks to its drag-and-drop interface.

First click on the ‘Layout Manager' button, which will lead to the 'Layout Manager' screen.

This will open up allowing you to drag-and-drop your toolbars and icons in order to craft your own bespoke layouts.

There are also customisable options for the toolbar header. These options are found under the 'Header' tab:

Buttons Settings

Setting
Description
Show Versions: This option determines if the 'Versions' button is displayed in the Header UI of the editor's toolbar.
Show New: This option determines if the 'New' button is displayed in the Header UI of the Editor's toolbar.
Show Save: This option determines if the 'Save' button is displayed in the Header UI of the Editor's toolbar.
Show Undo: This option determines if the 'Undo' button is displayed in the Header UI of the Editor's toolbar.
Show Redo: This option determines if the 'Redo' button is displayed in the Header UI of the Editor's toolbar.
Show Find: This option determines if the 'Find' button is displayed in the Header UI of the Editor's toolbar.
Show Close: This option determines if the 'Close' button is displayed in the Header UI of the Editor's toolbar.

Tabs Settings

Setting
Description
Show Source: This option determines if the 'Source' tab is displayed in the Header UI of the editor's toolbar.
Show Design: This option determines if the 'Design' tab is displayed in the Header UI of the editor's toolbar.
Show Elements: This option determines if the 'Show Elements' tab is displayed in the Header UI of the Editor's toolbar.

Read more: Layout Manager

  • Hits: 52